Standard Poodle Ear Cleaning
There are several sections to the Standard Poodle Ear Cleaning page:
1. Basic Ear Cleaning
2. Ear infection handlings
1. Basic Standard Poodle Ear Cleaning
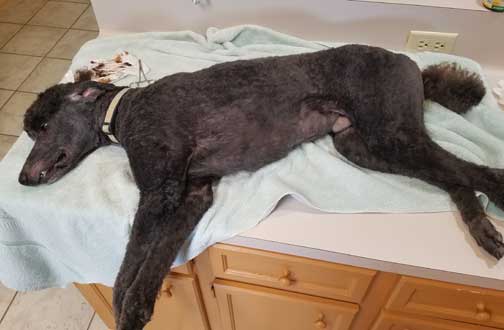
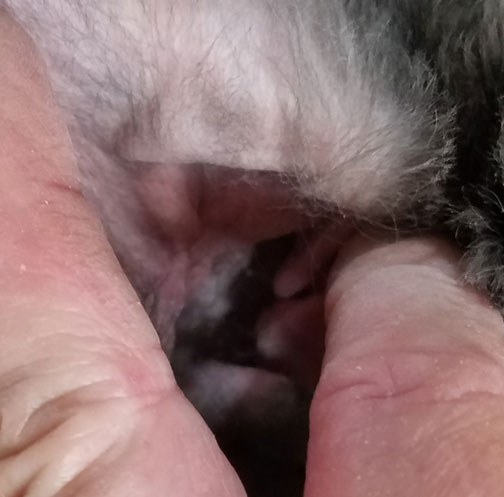
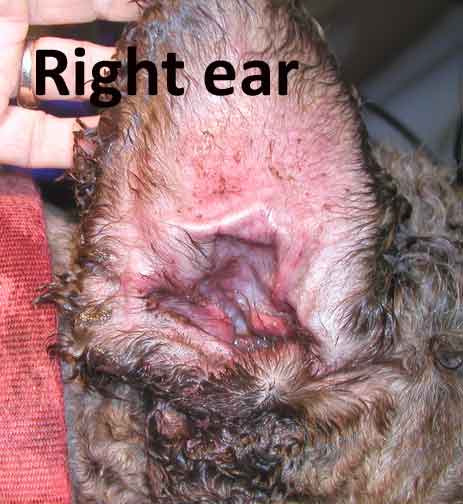
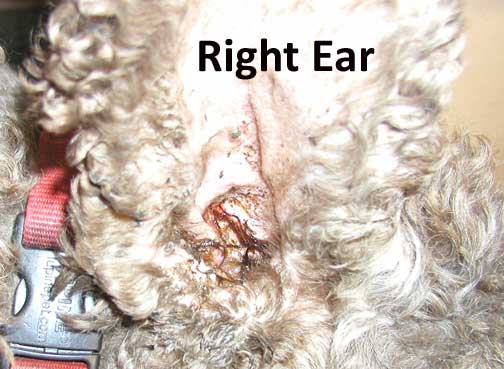
Rascal (a customer's pup from Tes) could be said to have received a nice grooming from the look of this picture. It's a nice clipping but DEFINITELY NOT complete by this groomer...the ears are not cleaned at all :o((( " Rascal's Right ear is thick with hair and oozing an infection needing medication.
I have wanted to show ear cleaning for some time and hope the pictures below with instructions help you do the best job possible to keep your poodle's ears healthy.
This was shared by a customer: "The groomer that did Trix argued that in the last 5 years they are finding plucking it hurts more than helps.....NO..No.no. certain breeds who knows??? (I doubt it though). Its better to overdue than deal with a yucky nasty ear (infection) by not doing. If people don't have a hemostat I have used a flashlight and tweezers, lol little more difficult but it does the job!
The main thing is though...people need not be afraid of arguing with a groomer! They are just that...groomers. You bought your poodle from a dog breeder with 15+ years experience in THAT breed, listen to the PROFESSIONAL! Once I brought that up, she caved and did her ears. Was her work to your standards? No, but then again I have your standards when it comes to ears (cleaning)! LoL" by DG
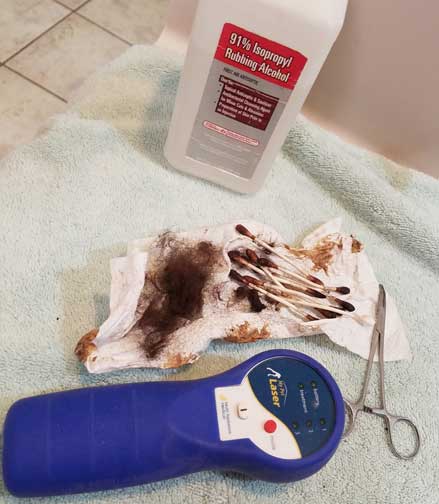
Tools needed:
- Rubbing alcohol
- ear cleaning powder
- q-tips
- hemostat to pull hair
- paper towels
NOTES:
1. I work with ALL my standard poodles on a counter. It teaches them submissiveness and gets them to my eye level to control.
2. To start grooming you may need a second hand to help control your poodle while one works on the ears.
3. In the picture above for Standard Poodle Ear Cleaning, Rascal fought me until the last 10 minutes (1 hour of cleaning)...he finally submitted to my control of having him lay still and gave me a grin at the end :o)
Now I begin...
1. First I would take the grooming clippers and shave the hair under the ear leather (flap) with a close blade like a #30. I want air to flow into the ear, not to be stopped by hair.
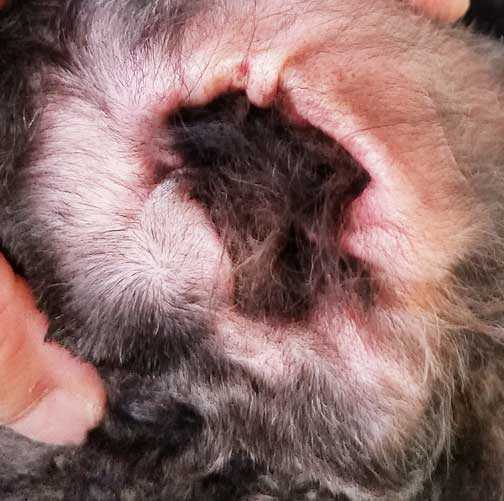
2. See how full the ear is with hair? We're going to pull it ALL out so air can flow and keep it dry inside the ear.
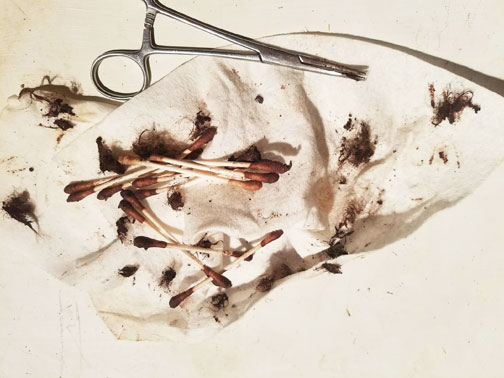
3. Take the hemostat and start pulling small sections out at a time...NOT a lot as that truly hurts, a little at a time doesn't.
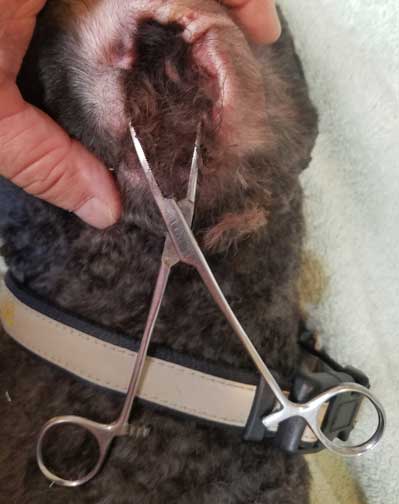
4. Keep plucking, and plucking, plucking, and plucking...using the paper towel to place the hair on and wipe the hemostat.
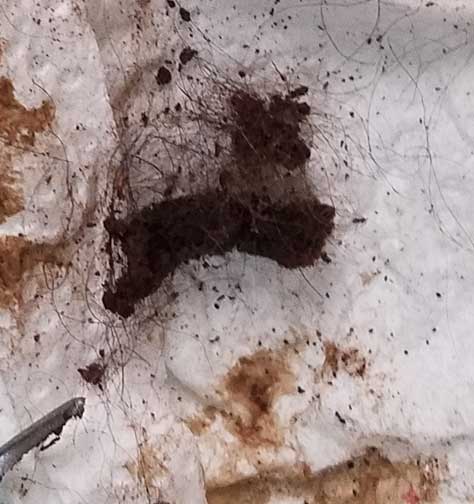
5. The pictures below jump to the infected ear...using tissue, wipe as much fluid out as gently as possible. Pluck the hair out as gently as possible.
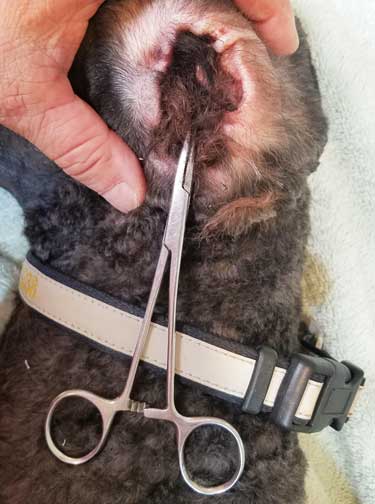
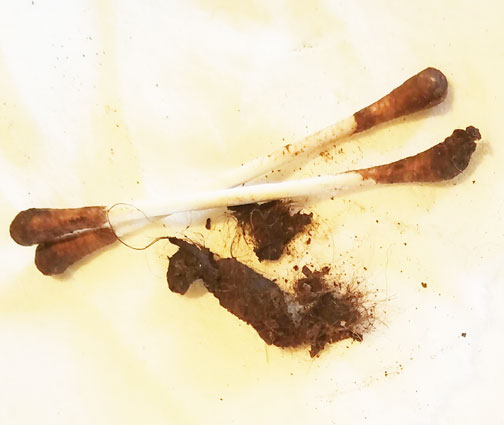
6. With the alcohol cap filled, take q-tips dipped in alcohol and start to clean out the bad gunk gently...q-tip with alcohol...
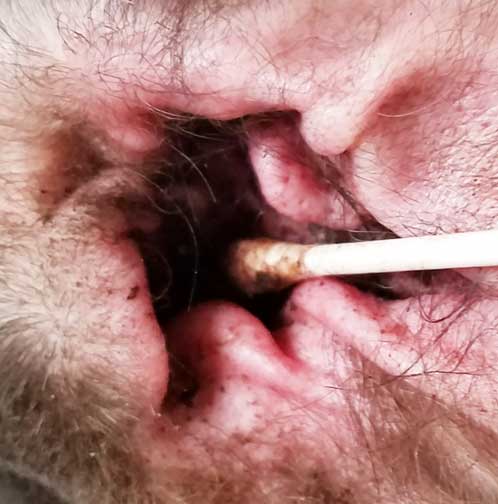
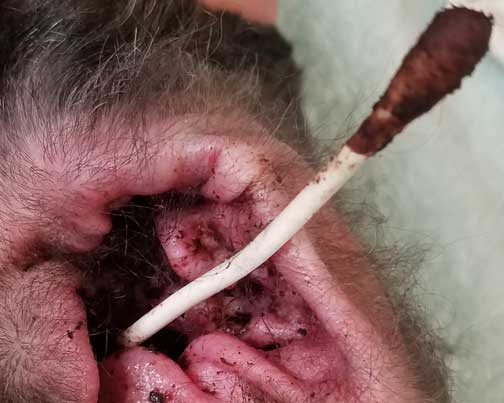
7. ...alcohol dipped q-tip...after alcohol dipped q-tip...cleaning away gunk...reaching deep into the ear, gently...
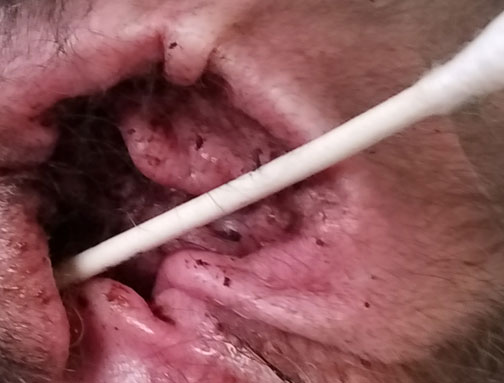
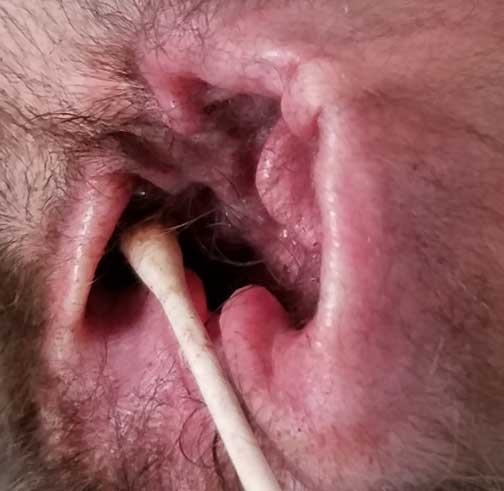
8. alcohol dipped q-tip...after alcohol dipped q-tip...after alcohol dipped q-tip, keep pulling gunk out gently until you start to see the ear cleaned up...right on down into the ear canal...

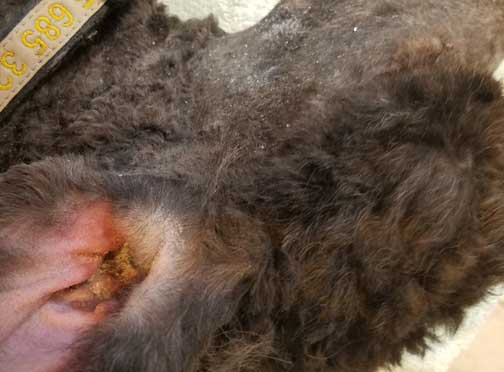
9. Now this is how clean it should look :o) This makes for a Happy Happy cleaned ear...still more to go...this was the infected ear...let's take a look at the right ear now...
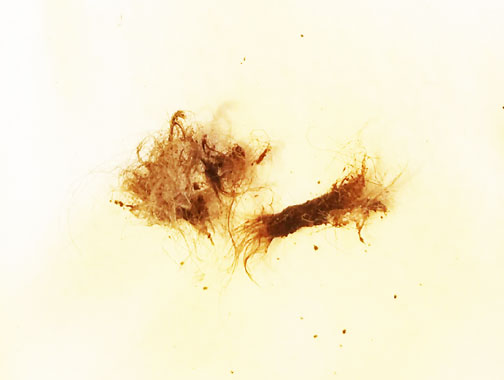
10. I pluck away to find the 1 inch long ear plug...which would soon get wet and start infecting that ear...and THAT is why it is soooo needed to keep them groomed correctly! ...we continue onto step 11...
Ear plugs I've pulled from other customer spoos to show them how it should be done...
...now I continue to clean...
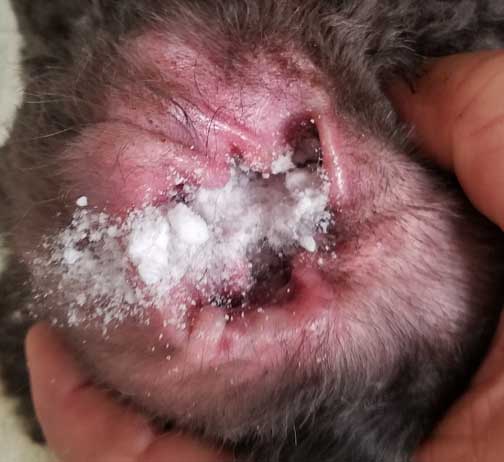
11. Take the ear cleaning powder and puff into the ear...
12. Puff the powder in the ear by taking fingers and squeezing ear together getting the powder to go throughout the ear drum...
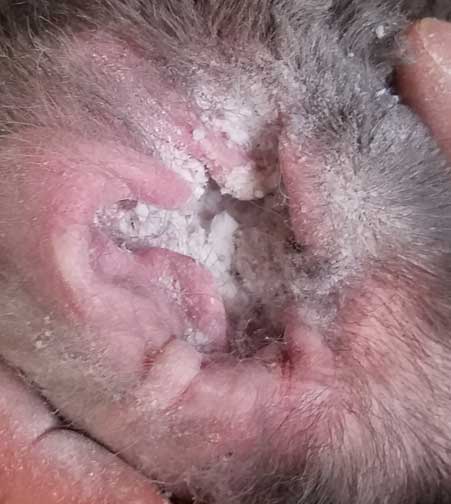
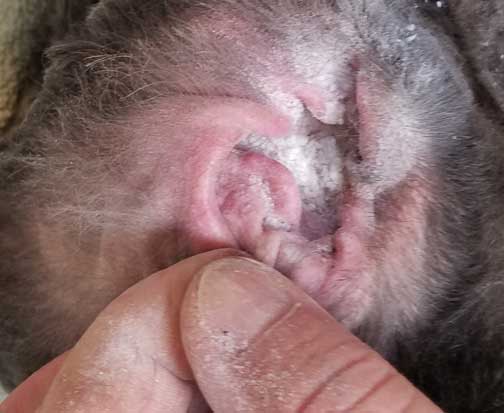
13. Use your fingers to pluck away the ear hair that has been left behind...go deep into the ear drum with your fingers, the powder helps you get ahold of the hair...pull, pull and pull all the hair you can find...
14. Pull all the hair you can...see how clean it looks below :o)
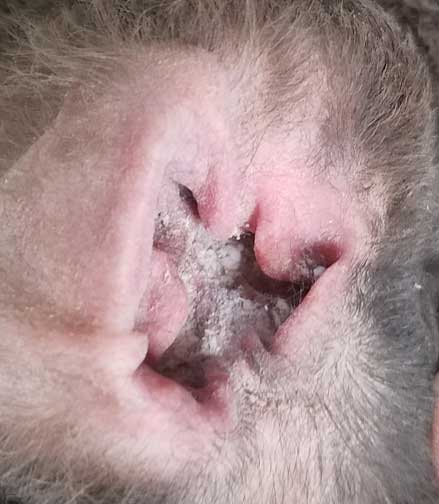
15. Clean right down into the ear canal...this has taken a good hour to finally get it ALL cleaned out...once done this way, it should never be so much work, yet it is a continual process for a good groomer...
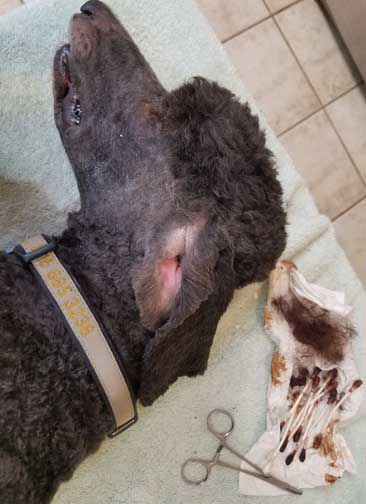
16. See how relaxed Rascal has become...see all the hair, q-tips and ear plug pulled out...but I'm NOT done!
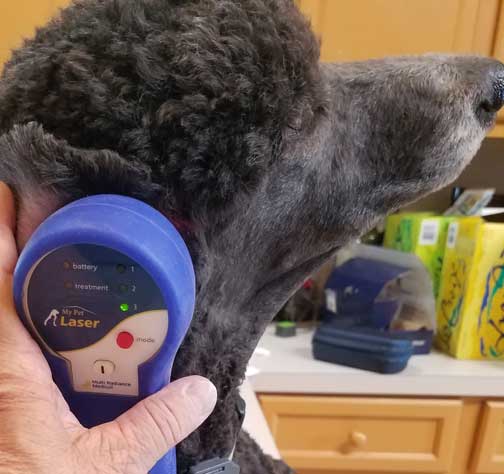
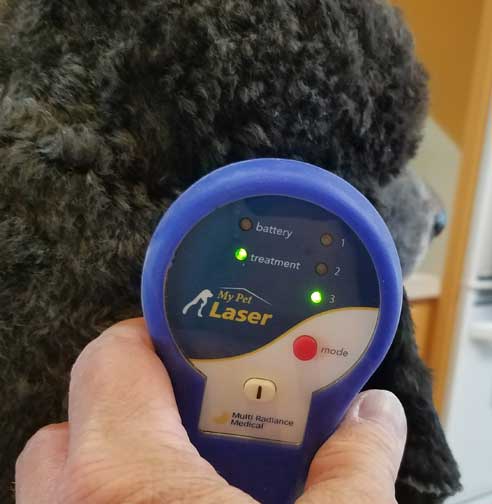
17. The infected ear needs more help...Tes has purchased a fabulous Pet Laser to work with any cuts, infections, sprains or what may, that comes to the standard poodles...now I use the laser several times in a day to help Rascal's ear heal faster...it is a $4,000 piece of equipment, vital to my Royal Standard Poodle program...
2. Ear infection handlings
This is in relation to long floppy eared Standard Poodle Care.
First, any ear infections your pet might have needs to be reviewed and assisted healing by a vet when necessary ... I have found several treatments that work as above and written about below. This is all resulting from Bruno's 2 long years of ear infection and the off and on again of customer ear infected spoos :o(
1. Blue Power Ear Formula recipe was started on Bruno after his ABSOLUTELY ulcerous ears developed January 2015 after trying to find the right dog food and his antibiotics to handle a tick born disease caused his loss of stomach flora. This formula started healing his ears within 3 days! What a relief!! After a week it was doubly better - and will ALWAYS recommend this formula!
Now; after months of using the Blue Power I just could not get his Right ear to finish healing all the way...always some ooey stuff coming out but nothing black. I now sell the cedar oil product 2. "Wild Stallion Ear Treatment": Neutralizes and kills mites, bacteria, fungus' and other ear problems" in the products section under #6. Another tried was Zymox.
ALSO I found at the vet's an old familiar ear healing powder called 3. "NFZ Puffer - Nitrofurazone Antibiotic Powder". I would soak with the Blue Power, spray afterwards with the Wild Stallion, dab excess moisture away from the outside and puff in lots of NFZ Puffer. FINALLY after 2 wks Bruno has not shook his head or had discharge- FINALLY!
4. I switched to organic - Vets Choice Health Extension dog food with probiotics. Dick Van Pattens sold to another company, did not inform me of changed ingredients.
5. I used essential oils to help it further.
The problem was continually discussed with 6. Pet Chiropractor Dr. Mark LaVallie, he started deep healing laser treatment on his ear.
7. He discussed adding more probiotics to his dog food that already contained it to help push the healing of his gut flora as well. I purchased, and continue to this day to use for all the spoos is "Probios powder" from Vets Plus, Inc.
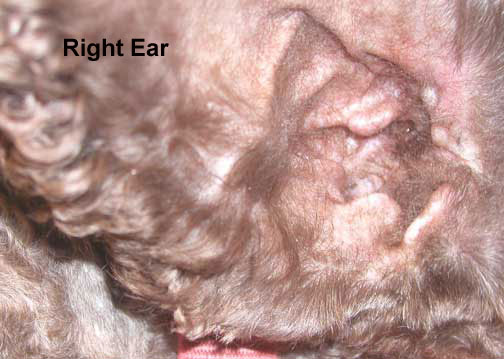
I believe what completed Bruno's right ear to finish healing was #6, 7 and then I took him to the vet again and this time they resolved it had developed into a bacteria infection...after 2 years of doing everything possible, 8. the vet prescribed Baytril/Dex Otic liquid ear medication and within the week it finished healing - TOTALLY! See picture below :o)) So he was getting laser treatments, probiotics every day in his food, and the prescription medication when it finally finished healing within a week of the medication being added.
Below: see how red, raw and oozing his ears had become :o((
 a) soooo bad! |
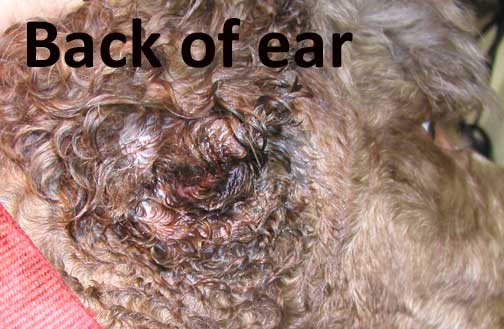 The oozing caused the lower back of his ear to become red and raw too. |
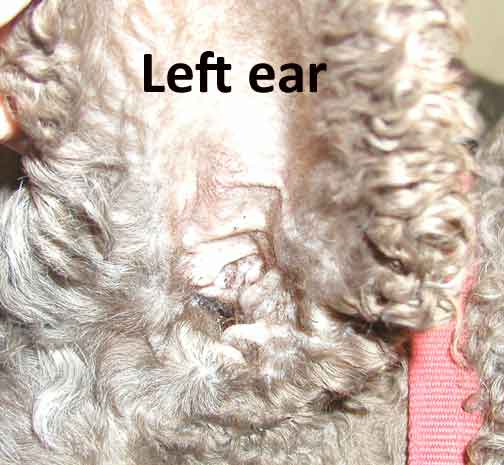
 b) MUCH better!! Remember the Left ear had healed within several months of treatments. FINALLY right ear healed after 2 years! 1/20/16 Healthy pink cleaned ears. Now any time I see the slightest start of an infection I immediately get onto cleaning ears as 1. Basic Standard Poodle Ear Cleaning above! But there's more info below... |
  |
We all hate to see our pet so miserable, it makes me miserable, and yes we listen to this, we try that, and each is so unique to their health, we have to wait for results, always hurry up and wait...hoping this helps someone out there, sooner then later.
Last but not least: some people think you shouldn't pull the hairs from a poodle's ear...SOME poodles have very little ear hair (reds and apricots), but ALL have continual growing hair that actually plugs up and can cause their balance issues, infections, and more...SO - YES! CLEAN their ears of excess ear hair that this does not occur, observe your poodle and their needs.
Look at your puppies ears upon their arrival from me to see how they should look for their future.
1. BLUE POWER EAR TREATMENT:
- 16 OZ. ISOPROPYL ALCOHOL (some people will use Witch Hazel instead as it is milder - Tes used the Witch Hazel for marvelous results!) Witch Hazel can be found at any Walmart store.
- 4 TABLESPOONS BORIC ACID POWDER - found at drug stores
- 16 DROPS-GENTIAN VIOLET SOLUTION 1% (AVAILABLE AT CVS, THRIFTY, and any small home Pharmacy will make some up for you if you ask).
- Mixing bottle with squirt head to use with above ingredients
Mix together in larger bottle and shake well. You will also need to shake solution every time you use it to disperse the Boric Acid Powder. To use, pour into a bottle with squirt head (or what works for you) to dispense the solution to the affected ear. (pictures to come)
TREATMENT:
Evaluate condition of ears before treating and if very inflamed and sore, do not attempt to pull hair or clean out ear at all. Wait till Inflammation has subsided which will be about 2 days. Shake bottle each time before using. Flood ear with solution, massage gently
to the count of 60. Flood ear again on first treatment and leave alone without massaging. Dog will shake out the excess.
TIMING IS AS FOLLOWS:
- Treat 2 times per day for the first week up to two weeks, depending on severity of infection.
- Treat 1 time per day for 1 to 2 weeks.
- Treat 1 time per week for 2 weeks,
- then 1 time per month.
You will find that despite the alcohol/witch hazel, the dog will not object to even the first treatment. The boric acid soothes the ear. The Gentian Violet is an anti-infection agent. The solution appears to work well on any and all ear problems from mites to canker ears.
After the 2nd or 3rd day you can clean out the ears with Q-Tips or cotton balls.
The success rate for this treatment is 85-99%. Those who do not succeed have usually not done the treatment long enough or have not kept to the timetable above. Dogs on the verge of ear canal surgery have been returned to normal with only the regular follow up treatment necessary to maintain the ear. After the ear problems are cleared up, only a maintenance dose is necessary during regular grooming.
NOTE - When treating the ears, avoid doing it in an area where the Blue Mixture can stain walls, carpet, furniture, clothing etc. When the dog shakes its ears, the solution will spray all over the place! Any color remaining outside the ear can be washed off with a sponge or washcloth, soap and water. On white dogs, you may wish to place a cotton ball in each ear for a few seconds, while they shake.
DO NOT FORGET TO TAKE OUT THE COTTON BALLS.
* Shake the bottle well as you use it as the Boric Acid settles quickly
Special thanks to "Tempest Deptuch" for sharing this information with the public and permission to use on line...
NOW > on a weekly basis (depending on pet - maybe 2x per week), have a good light over your shoulder that you can look into the ear to see what you're doing.
|
2. Zymox and 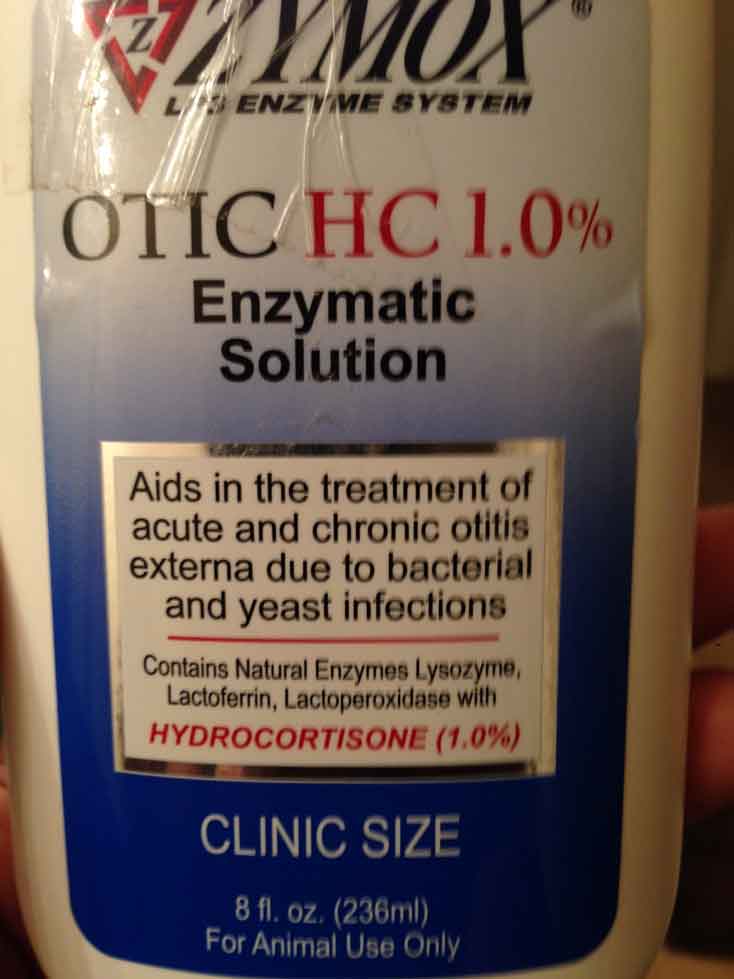 |
Wild Stallion cedar oil treatment 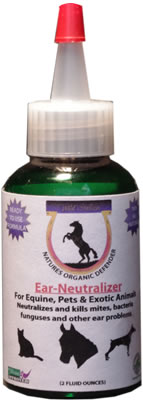 |
Another treatment that a customer has brought to our attention is Zymox Ear Solution. You put 3 drops in the affected ear once daily.
When the ear is cleared up the cleanser is used as a maintenance. You may need to order these products online as Petsmart/Petco do not always have them.
If you find that you have to keep using the treatment to keep the ears healthy, you may have a Pseudomonas bacteria remaining in the ear, which can be cleared up by using a Vinegar and Water flush two times a week. I chose the veterinary routes medication before I became aware of this method.
- The suggested amounts of Vinegar & Water are: 1 tablespoon Vinegar to 1 cup warm water.
- You can also obtain an excellent ear wash from your vet that has boric acid and vinegar in it. It is called DERMA PET Ear/Skin Cleanser for Pets.
More on ear cleaning from my first decade of being a breeder:
a. If I get poodles in for grooming with super dirty ears I always handle with Dr. Foster's ear liquid cleaner (I like the best) or you can purchase dog ear liquid at a pet store, vet, or other dog catalog. I squirt it in and rub their ears for awhile to break the gunk down. Then I take q-tips and clean out the best I can without it getting dry, otherwise it'll make the inside of their ears raw. I would do this two days later if I had them available, really keeping the q-tip wet with liquid and cleaning out more gunk. It's easy to overdue, so caution not to overwork.
b. After you've cleaned the gunk out the next important thing on the first day is to clip and pull any hair in the inner ear away as much as possible using an ear powder to help grip. One can purchase forceps to help pull the hairs out as well. I use blunt ended short scissors to trim away the outside hairs then opening up the ear canal with my fingers, and sometimes having a second person help by holding (if it's a struggling dog), I use the forceps/fingers to pull in small amounts as much hair out as possible so I can see the skin of the inner ear - not hair. You just grab onto small sections of hair with 2 fingers tightly and pull it out. Don't grab big amounts, small amounts only. This should get your pet some good clean ear canals which truly helps keep away problems. Ear powder afterward soothes their ears then.
If you get your puppy from us, look into their ears right away to see how clean they should be as I maintain them during their growing time with us. This is how they should look weekly, and especially coming home from a groomer! Hopefully I've kept them up for you ;o)
Get after yourself to do this weekly if they're the pet that needs it weekly, or twice a week if need be!
c. The groomer should make sure when he uses his clippers he takes off the hair under the long leather flap as well to assure air circulation for your Standard Poodle Care. I always maintain short hair under the ear flaps of our Royal poodles.
d. Then, I tell my customers every week--every week you need to handle ears and nails. The next is weekly maintenance:
i. I fill a cap of alcohol now, I use alcohol now as it kills any bug mites/germs etc. that might want to make a home. Using q-tips dunked with alcohol I have the light behind me and open up the ear with my fingers and start to swab any gunk, changing q-tips frequently until they come out clean, should only have to use no more then 3 by now per ear, never over rub or let q-tip dry.
ii. Pull/clip any excess hair always after you've used the alcohol as it will take any sting away in using the powder.
When I first started breeding both my poodles had ear problems. After the vet medicine handled the infection. I started this weekly/semi weekly routine and continue it to assure their healthy ears. I start out right away with the pups and do this, say watching TV etc, is their weekly grooming time for ears and nails.
Kodi seemed to have the cleanest ears of all and was extremely laid back when I cleaned him, Zain's were dirtier and she hates having her ears cleaned! They're all different that's for sure.
That's my routine, happy happy pets :o)))
